
Ещё одна возможность для получения информации о My Visual Database и общения на тему визуального программирования.
Тегеграм-канал:
You are not logged in. Please login or register.

My Visual Database → Posts by k245
Ещё одна возможность для получения информации о My Visual Database и общения на тему визуального программирования.
Тегеграм-канал:
The topic is interesting, but you need to dig deeper. In one of the projects, I implemented color palettes: color data was stored in a database, the user could create/customize the palette and select it. And on the code side, I made several procedures that updated all the colors according to the selected scheme.
I also repainted the images in the desired color, but this only works with images in the BMP format.
Below are the basic procedures.
procedure Colors_LoadTheme(AID: string);
// загрузка схемы
var
  tmpSQL: string;
  tmpDataSet: TDataSet;
  tmpIndex: Integer;
  tmpName: string;
begin
  try
    // извлекаем цвета, в приоритете - индекс, если данных по схеме ещё нет в базе, все цвета будут чёрными.
    tmpSQL := 'SELECT ci.id, coalesce(cu.color,0) as color, coalesce(cu.id_color_item1,0) as colorIndex, ci.name ' +
      ' FROM color_item ci ' + ' LEFT JOIN color_ui cu on ci.id = cu.id_color_item ' +
      'WHERE cu.id_color_theme = ' + AID;
    SQLQuery(tmpSQL, tmpDataSet);
    while not tmpDataSet.EOF do
    begin
      tmpName := tmpDataSet.FieldByName('name').asString;
      tmpIndex := Colors_GetColorIndex(tmpName);
      if tmpIndex = -1 then
        ErrMsg('Colors_LoadTheme', 'Не найден цвет с именем ' + tmpName)
      else
      begin
        UIColors[tmpIndex] := tmpDataSet.FieldByName('color').asInteger;
        UICIndex[tmpIndex] := tmpDataSet.FieldByName('colorIndex').asInteger - 1;
      end;
      tmpDataSet.Next;
    end;
  finally
    tmpDataSet.Free;
  end;
  // инициализировать цветные картинки
  Colors_Image_Init;
end;

procedure Form_UpdateColor(AForm: TAForm);
// обновить цвета на форме
var
  i: integer;
  tmpPanel: TdbPanel;
  tmpFormColor: TColor;
begin
  // обновление цветов у элементов формы
  tmpFormColor := Colors_Get(FORM_COLOR); // цвет формы
  AForm.Color := Colors_Get(FORM_FRAME_COLOR); // цвет рамки
  FindC(AForm, 'panWork', tmpPanel);
  tmpPanel.Color := tmpFormColor;
  FindC(AForm, 'panBottom', tmpPanel, False);
  if tmpPanel <> nil then
    tmpPanel.Color := tmpFormColor;
  FindC(AForm, 'panTop', tmpPanel, False);
  if tmpPanel <> nil then
    tmpPanel.Color := tmpFormColor;
  FindC(AForm, 'panTopFilter', tmpPanel, False);
  if tmpPanel <> nil then
    tmpPanel.Color := tmpFormColor;
  FindC(AForm, 'panRight', tmpPanel, False);
  if tmpPanel <> nil then
    tmpPanel.Color := tmpFormColor;
  // обновить цвета у компонент
  for i := 0 to AForm.ComponentCount - 1 do
  begin
    VC_UpdateColor(AForm.Components[i]); // обновление цветов у компонент
  end;

end;


procedure VC_UpdateColor(AComponent: TComponent;);
// обновление цвета
begin
  try
    case GetVClassName(AComponent.Name) of
      T_FORM_CAPTION:
        FormCaption_UpdateColor(TdbPanel(AComponent));
      T_USER_DATA_PANEL:
        UserDataPanel_UpdateColor(TdbPanel(AComponent));
      T_ROUNDED_LABEL:
        RoundedLabel_UpdateColor(TdbLabel(AComponent));
      T_ROUNDED_PANEL:
        RoundedPanel_UpdateColor(TdbPanel(AComponent));
      T_ROUNDED_BUTTON:
        RoundedButton_UpdateColor(TdbButton(AComponent));
      T_ROUNDED_CHECKBOX:
        RoundedCheckbox_UpdateColor(TdbCheckbox(AComponent));
      T_ROUNDED_RADIOBOX:
        RoundedRadiobox_UpdateColor(TdbCheckbox(AComponent));
      T_ROUNDED_GRID:
        RoundedGrid_UpdateColor(TdbStringGridEx(AComponent));
      T_ROUNDED_COMBOBOX:
        RoundedCombobox_UpdateColor(TdbComboBox(AComponent));
      T_PARENT_COMBOBOX:
        ParentCombobox_UpdateColor(TdbEdit(AComponent));
      T_ROUNDED_MEMO:
        RoundedMemo_UpdateColor(TdbMemo(AComponent));
      T_ROUNDED_PAGECONTROL:
        RoundedPagecontrol_UpdateColor(TdbPageControl(AComponent));
      T_ROUNDED_DATEPICKER:
        RoundedDatePicker_UpdateColor(TdbDateTimePicker(AComponent));
      T_IMAGE_EDIT:
        ImageEdit_UpdateColor(TdbImage(AComponent));
      T_ROUNDED_EDIT:
        RoundedEdit_UpdateColor(TdbEdit(AComponent));
      T_FILESTORE:
        FileStore_UpdateColor(TdbEdit(AComponent));
      T_ROUNDED_TREE:
        RoundedTree_UpdateColor(TdbStringGridEx(AComponent));
      T_PHONE_EDIT:
        PhoneEdit_UpdateColor(TdbEdit(AComponent));
      T_EDIT_PAGECONTROL:
        EditPagecontrol_UpdateColor(TdbPageControl(AComponent));
      T_ROUNDED_SPLITTER:
        RoundedSplitter_UpdateColor(TdbPanel(AComponent));
      T_MAIN_MENU:
        MainMenu_UpdateColor(TdbPanel(AComponent));
      T_WIDGET:
        Widget_UpdateColor(TdbPanel(AComponent));
      T_SCROLL_BAR:
        ScrollBar_UpdateColor(TdbPanel(AComponent));
      T_ROUNDED_COLOR_EDIT:
        RoundedColorEdit_UpdateColor(TdbEdit(AComponent));
      T_CURRENCY_EDIT:
        CurrencyEdit_UpdateColor(TdbEdit(AComponent));
      T_NEWS_PANEL:
        NewsPanel_UpdateColor(TdbPanel(AComponent));
      T_DROP_DOWN_PANEL:
        DropDownPanel_UpdateColor(TdbPanel(AComponent));
      T_POP_UP_PANEL:
        PopUpPanel_UpdateColor(TdbPanel(AComponent));
      T_TOOLBAR:
        ToolBar_UpdateColor(TdbPanel(AComponent));
      T_ROUNDED_LIGHT_COMBO:
        RoundedLightCombo_UpdateColor(TdbEdit(AComponent));
      T_TASK_LEGEND_PANEL:
        TaskLegendPanel_UpdateColor(TdbPanel(AComponent));
    end;
  except
    ErrMsg('VC_UpdateColor(' + AComponent.Name + ')');
  end;
end;

procedure RoundedLabel_UpdateColor(ALabel: TdbLabel);
// обновить цвет
var
  S: TShape;
  tmpForm: TAForm;
  tmpName: string;
begin
  CForm(ALabel, tmpForm);
  tmpName := DeleteClassName(ALabel.Name);
  //
  ALabel.Color := Colors_Get(LABEL_COLOR);
  ALabel.Font.Color := Colors_Get(LABEL_TEXT_COLOR);
  if not ALabel.Transparent then
  begin
    S := TShape(tmpForm.FindComponent(T_SHAPE + tmpName + SX_RIGHT));
    S.Pen.Color := ALabel.Color;
    S.Brush.Color := ALabel.Color;
  end;
end;
Unfortunately, I don’t have a simple example, but I hope the principle itself will be clear.
Вот пример создания Мемо с закруглениями:
procedure RoundedMemo_Create(AMemo: TdbMemo);
// создание
// если в свойстве TEXT указать NOFRAME, то отображение будет без рамки; COPY_TO_CLIPBOARD - добавляет кнопку копирования в буфер обмена
var
  s: TShape;
  tmpLabel: TdbLabel;
  tmpLabelLimit: TdbLabel;
  tmpForm: TAForm;
  tmpName: string;
  tmpImage: TdbImage;
  tmpImageName: string;
  tmpPanel: TdbPanel;
  tmpParam: array of string; // параметры
  tmpBPanel: TdbPanel;
  i: integer;
begin
  tmpParam := SplitString(AMemo.Text, '%');
  AMemo.Text := '';
  CForm(AMemo, tmpForm);
  tmpName := DeleteClassName(AMemo.Name);
  // панель - подложка
  tmpPanel := TdbPanel.Create(tmpForm);
  tmpPanel.Name := T_PANEL + tmpName + SX_BACK;
  tmpPanel.Caption := '';
  tmpPanel.Parent := AMemo.Parent;
  tmpPanel.BevelWidth := 0;
  tmpPanel.Top := AMemo.Top;
  tmpPanel.Left := AMemo.Left;
  tmpPanel.Width := AMemo.Width;
  tmpPanel.Height := AMemo.Height;
  tmpPanel.Anchors := AMemo.Anchors;
  // пересаживаем на неЄ мемку
  AMemo.Parent := tmpPanel;
  AMemo.Top := 0;
  AMemo.Left := 0;
  //
  AMemo.BorderStyle := bsNone;
  SetFont(AMemo.Font, FORM_TEXT_SIZE);
  if (Length(tmpParam) = 1) and (tmpParam[0] = 'NOFRAME') then
  begin // нет рамки и надписи - используетс¤ дл¤ отображени¤ на панели
    AMemo.TagString := 'NOFRAME'
  end
  else
  begin
    // красивая рамка состоит из 10-ти элементов
    // верхний левый угол
    s := TShape.Create(tmpForm);
    s.Name := T_SHAPE + tmpName + SX_TOP_LEFT;
    s.Parent := tmpPanel;
    s.Shape := stCircle;
    s.Top := 0;
    s.Left := 0;
    s.Height := RP_SIZE;
    s.Width := RP_SIZE;
    s.Anchors := akTop + akLeft;
    // верхний правй угол
    s := TShape.Create(tmpForm);
    s.Name := T_SHAPE + tmpName + SX_TOP_RIGHT;
    s.Parent := tmpPanel;
    s.Shape := stCircle;
    s.Top := 0;
    s.Left := tmpPanel.Width - RP_SIZE;
    s.Height := RP_SIZE;
    s.Width := RP_SIZE;
    s.Anchors := akTop + akRight;
    // нижний левый угол
    s := TShape.Create(tmpForm);
    s.Name := T_SHAPE + tmpName + SX_BOTTOM_LEFT;
    s.Parent := tmpPanel;
    s.Shape := stCircle;
    s.Top := AMemo.Height - RP_SIZE;
    s.Left := 0;
    s.Height := RP_SIZE;
    s.Width := RP_SIZE;
    s.Anchors := akBottom + akLeft;
    // нижний правый угол
    s := TShape.Create(tmpForm);
    s.Name := T_SHAPE + tmpName + SX_BOTTOM_RIGHT;
    s.Parent := tmpPanel;
    s.Shape := stCircle;
    s.Top := tmpPanel.Height - RP_SIZE;
    s.Left := tmpPanel.Width - RP_SIZE;
    s.Height := RP_SIZE;
    s.Width := RP_SIZE;
    s.Anchors := akBottom + akRight;
    // горизонтальна¤ полоска
    s := TShape.Create(tmpForm);
    s.Name := T_SHAPE + tmpName + SX_HORIZ;
    s.Parent := tmpPanel;
    s.Shape := stRectangle;
    s.Top := RP_SIZE div 2;
    s.Left := 0;
    s.Height := tmpPanel.Height - RP_SIZE;
    s.Width := tmpPanel.Width;
    s.Anchors := akBottom + akRight + akTop + akLeft;
    // вертикальна¤ полоска
    s := TShape.Create(tmpForm);
    s.Name := T_SHAPE + tmpName + SX_VERT;
    s.Parent := tmpPanel;
    s.Shape := stRectangle;
    s.Top := 0;
    s.Left := RP_SIZE div 2;
    s.Height := tmpPanel.Height;
    s.Width := tmpPanel.Width - RP_SIZE;
    s.Anchors := akBottom + akRight + akTop + akLeft;
    // верхн¤¤ горизонтальна¤ лини¤
    s := TShape.Create(tmpForm);
    s.Name := T_SHAPE + tmpName + SX_TOP;
    s.Parent := tmpPanel;
    s.Shape := stRectangle;
    s.Top := 0;
    s.Left := RP_SIZE div 2;
    s.Height := 1;
    s.Width := tmpPanel.Width - RP_SIZE;
    s.Anchors := akRight + akTop + akLeft;
    // нижн¤¤ горизонтальна¤ лини¤
    s := TShape.Create(tmpForm);
    s.Name := T_SHAPE + tmpName + SX_BOTTOM;
    s.Parent := tmpPanel;
    s.Shape := stRectangle;
    s.Top := tmpPanel.Height - 1;
    s.Left := RP_SIZE div 2;
    s.Height := 1;
    s.Width := tmpPanel.Width - RP_SIZE;
    s.Anchors := akBottom + akRight + akLeft;
    // лева¤ вертикальна¤ лини¤
    s := TShape.Create(tmpForm);
    s.Name := T_SHAPE + tmpName + SX_LEFT;
    s.Parent := tmpPanel;
    s.Shape := stRectangle;
    s.Top := RP_SIZE div 2;
    s.Left := 0;
    s.Height := tmpPanel.Height - RP_SIZE;
    s.Width := 1;
    s.Anchors := akBottom + akTop + akLeft;
    // права¤ вертикальна¤ лини¤
    s := TShape.Create(tmpForm);
    s.Name := T_SHAPE + tmpName + SX_RIGHT;
    s.Parent := tmpPanel;
    s.Shape := stRectangle;
    s.Top := RP_SIZE div 2;
    s.Left := tmpPanel.Width - 1;
    s.Height := tmpPanel.Height - RP_SIZE;
    s.Width := 1;
    s.Anchors := akBottom + akRight + akTop;
    // надпись
    tmpLabel := TdbLabel.Create(tmpForm);
    tmpLabel.Name := T_LABEL + tmpName + SX_CAPTION;
    tmpLabel.Parent := tmpPanel.Parent;
    tmpLabel.Alignment := taLeftJustify;
    tmpLabel.Caption := AMemo.Hint;
    //
    if isRequiredMark(tmpLabel.Caption) then
      tmpLabel.Tag := TG_REQUIRED_FIELD;
    //
    tmpLabel.Top := tmpPanel.Top - tmpLabel.Height - 10; // - 2
    tmpLabel.Left := tmpPanel.Left; // AEdit.Left;

    SetFont(tmpLabel.Font, EDIT_CAPTION_FONT_SIZE);
    if (Length(tmpParam) = 2) and (tmpParam[0] = 'CHECK_LENGTH') then
    begin
      // добавляем контрол отображения лимита
      tmpLabelLimit := TdbLabel.Create(tmpForm);
      tmpLabelLimit.Name := T_LABEL + tmpName + SX_TOP_RIGHT;
      // лимит храним в теге
      tmpLabelLimit.Tag := StrToInt(tmpParam[1]);
      tmpLabelLimit.Parent := tmpPanel.Parent;
      tmpLabelLimit.Alignment := taRightJustify;
      tmpLabelLimit.Anchors := AMemo.Anchors;
      tmpLabelLimit.Autosize := False;
      SetFont(tmpLabelLimit.Font, EDIT_CAPTION_FONT_SIZE);
      // положение на экране
      tmpLabelLimit.Top := tmpLabel.Top;
      tmpLabelLimit.Left := tmpLabel.Left;
      tmpLabelLimit.Height := tmpLabel.Height;
      tmpLabelLimit.Width := tmpPanel.Width;
      // обработчик на изменение данных
      AMemo.OnChange := @RoundedMemo_CheckLimit;
      RoundedMemo_CheckLimit(AMemo);
    end;
    // коррекци¤ по ширине
    AMemo.Width := AMemo.Width - 16;
    AMemo.Height := AMemo.Height - 16;
    AMemo.Left := AMemo.Left + 8;
    AMemo.Top := AMemo.Top + 8;
    // положение на экране

    for i := 0 to Length(tmpParam) - 1 do
    begin
      if tmpParam[i] = 'COPY_TO_CLIPBOARD' then
      begin
        // добавляем панель с кнопкой правее основной панели
        tmpBPanel := TdbPanel.Create(tmpForm);
        tmpBPanel.Name := T_PANEL + tmpName + SX_BUTTON_PANEL;
        tmpBPanel.Caption := '';
        tmpBPanel.Parent := tmpPanel.Parent;
        tmpBPanel.BevelWidth := 0;
        //
        tmpBPanel.Height := 33; // уточнить
        tmpBPanel.Top := tmpPanel.Top + tmpPanel.Height - tmpBPanel.Height;
        tmpBPanel.Width := tmpBPanel.Height;
        tmpBPanel.Left := tmpPanel.Left + tmpPanel.Width - tmpBPanel.Width;
        // коррктировка ширины основной панели
        tmpPanel.Width := tmpPanel.Width - tmpBPanel.Width - 4;
        tmpBPanel.Tag := 1; // признак наличия кноки
        // якоря зависят от якорей основной панели
        if tmpPanel.Anchors AND akRight then
          tmpBPanel.Anchors := akRight
        else
          tmpBPanel.Anchors := akLeft;
        //
        if tmpPanel.Anchors AND akBottom then
          tmpBPanel.Anchors := tmpBPanel.Anchors + akBottom
        else
          tmpBPanel.Anchors := tmpBPanel.Anchors + akTop;
        // добавляем кнопку
        tmpBPanel.TagString := 'CopyToClipboard';
        PanelButton_Create('CopyToClipboard', tmpBPanel, -1, 'RoundedMemo_CopyToClipboard',
          'Скопировать текст в буффер обмена');
        break;
      end;
    end;

  end;
end;
Выглядит так:
Использование. На форму накидывается обычный TdbMemo, затем в скрипте вызывается RoundedMemo_Create(), в который передается ссылка на компонент. Процедура добавляет красоты и функциональности.
Do you have an example on how to do these designs? The rounded boxes look nice, how about the special icons next to the window controls?
I had to “invent” and create many components myself (date input, scroll bar, checker, etc.). But this process was not completed: the color of the drop-down list is not controlled, problems with tables (color of scroll bars and footer/header lines). A lot of code was written, a whole library of “virtual classes”, but for a private project. Perhaps after some time I will have the opportunity to publish applied solutions.
Наверное, это работает... Для 10 строк в таблице. И даже для 30. Но если их больше ста, то бедная база.... попробуйте убрать SQL-запрос из цикла: включите его в основной запрос для выборки данных, а результат разместите в невидимой колонке.
Отличный дизайн интерфейса!
Насчет скруглений - можно заморочиться и сделать так:
1) убрать штатные границы и добавить картинки с нарисованными круглыми рамками
2) убрать штатные границы и добавить TShape c закругленными углами.
3) убрать штатные границы и рисовать на канве формы/панелей
Первый способ дает больше красоты, но дизайн жёстко привязывается к размеру форм и компонентов. Второй боле гибкий, но нужно писать много кода. Третий не пробовал )))
Я делал проект с кассой, но маленький и в нем использовался сканер штрих-кодов.
Этот проект я внедрял в сервисную программу https://myvisualdatabase.com/forum/view … hp?id=6853
если не разберетесь, пишите!I did a project with a cash register, but it was small and it used a barcode scanner.
I implemented this project into the service program https://myvisualdatabase.com/forum/view ... hp?id=6853
If you don't understand, write!
Фигасе маленький. Да тут без проектной документации не разобраться...
I wouldn't say it's small.
It’s impossible to figure this out without project documentation.
P.S. Из плюсов отмечу возможность локализации.
Обычно формируют два SQL-запроса по одному ID. Первый запрос для шапки документа, второй - для детализации.
SELECT * FROM acts
LEFT JOIN MyFirm ON MyFirm.id = acts.id_MyFirm
LEFT JOIN ConuterParty ON ConuterParty.id = acts.id_ConuterParty
WHERE act.id = <значение>
SELECT * FROM ActsPosition
LEFT JOIN nomenclature ON nomenclature.id = ActsPosition.id_nomenclature
WHERE ActsPosition.id_acts = <значение>Первый запрос возвращает реквизиты документа, второй - все записи, которые относятся к документу:
It is unlikely that you will find a ready-made free project that fully meets your needs.
There are many opportunities on this forum: find a ready-made similar solution, find tips for creating the application you need yourself, or find a specialist who will create the software product you need. So what are you looking for? Formulate your requirements more precisely.
А зачем вам привязываться к одной таблице? Поищите на форуме скрипты, которые позволяют формировать отчет из любого количества таблиц и параметров.
Если не найдете, то посмотрите здесь:
https://k245.ru/software-ru/clearapp.html
Модуль: report.pas
Процедура: Report_Open()
Пример использования:
https://k245.ru/mvdb/linejnyj-raskroj.html
UserApp_LinearCalc_Report()
There is one caveat. If there are several users in the database with the same name, then you need to decide how to display the search result. Typically in this case the result is displayed as a comma separated list of values. The group_concat() SQL-function will help in implementing such functionality.
procedure option1 (Sender: TObject);
begin
  form1.edit2.text := sqlexecute('select GROUP_CONCAT(age,",") from example where name = "'+form1.edit1.text+'"');
end;Hello,
Can this be done with MVD?
Add a treeview to create and select entries,
then auto-display previously filled form fields when selecting treeview entries.Adding new entries.
Create groups.
Filter groups from the form data.
Here is a 3 minutes Youtube ID of the reference video.
o6wqnpdtFQg0:10 Clicking treeview entries / auto-display in form
0:31 Creating new entries / filling the form
1:02 Creating Groups
1:19 Filtering groups using form data
1:40 default / pre-made data in databaseThank you for your insights.
I am sure that all this can be done at the MVDB. But scripts will be required to implement functions such as displaying data in the work area depending on the selected tree element. Most of all you will have to tinker with the mechanism of smart groups, but it can also be implemented. But you need to start not with the interface, but with the data structure. And everything else will follow. ))
There are two implementation options: 1) place all interface elements on one form (use TdbPageControl); 2) use several forms, displaying them on the main form. The first one is easier in the short term, the second one is better in the long term.
But again, you need to start with the data structure.
Unfortunately, the table columns are displayed from left to right. But you can add the first empty column and achieve the desired visual effect by setting the width of the first (empty) and all other data columns with a script.
TColorEdit
My Visual Database. Composant d'édition de couleurs DIY TColorEdit.
https://k245.ru/fr/mvm-fr/tcoloredit-3.html
Traduction : Yann Yvnec
Тема интересная: действительно, в большинстве случаях нужно блокировать одновременное редактирование, чтобы не было перетёрыча.
Хотя добавить в каждую таблицу поле проще, но я бы сделал вариант с отдельной таблицей - это позволит реализовать легко переносимое в другие проекты решение, не требующее модификации имеющихся таблиц. Спасибо за идею для очередной доработки моей коллекции библиотечных функций. Можно её развить в журнал аудита: кто какую форму открывал, когда и для чего (добавление, редактирование, удаление).
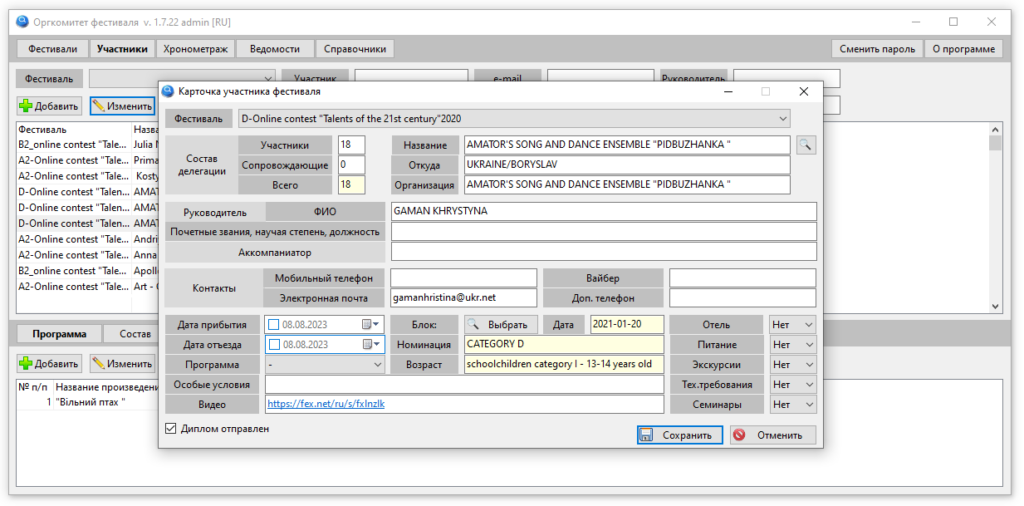
P.S. Есть опыт написания подобной программы ("Оргкомитет фестиваля" - https://k245.ru/software-ru/orgkomitet-festivalya.html). Интересно сравнить с вашим решением.
Пользовательский классификатор
Реализация пользовательской системы классификации объектов на примере грамматического словаря русского языка.
https://k245.ru/mvdb/polzovatelskij-klassifikator.html
The latest version 3.44.2 https://www.sqlite.org/index.html works very well.
Thank you! Indeed, this version works more stable! After installing this library, the inexplicable error when accessing the database, which was driving me crazy, disappeared.
Спасибо! Действительно, эта версия работает более стабильно! После установки данной библиотеки исчезла необъяснимая
ошибка при обращении к БД, которая сводила меня с ума.
Ressources et Internationalisation
Un mécanisme de localisation pratique qui ne nécessite pas de réécriture du code d'application créé dans My Visual Database.
https://k245.ru/fr/mvdb-fr/ressources-e … ation.html
Traduction : Yann Yvnec
I observed problems with column width in two cases: during the first launch and when the program crashed.
As for intelligent alignment of column widths, you can’t do without scripts. I agree that in some cases the proposed alignment options look good, but firstly, they provide an additional delay when displaying data, and secondly, they are not always convenient, so this, perhaps, can be done as an option in the grid settings through the pop-up menu. Thanks for the tip, I'll probably add such an option in the next version of Data Keeper.
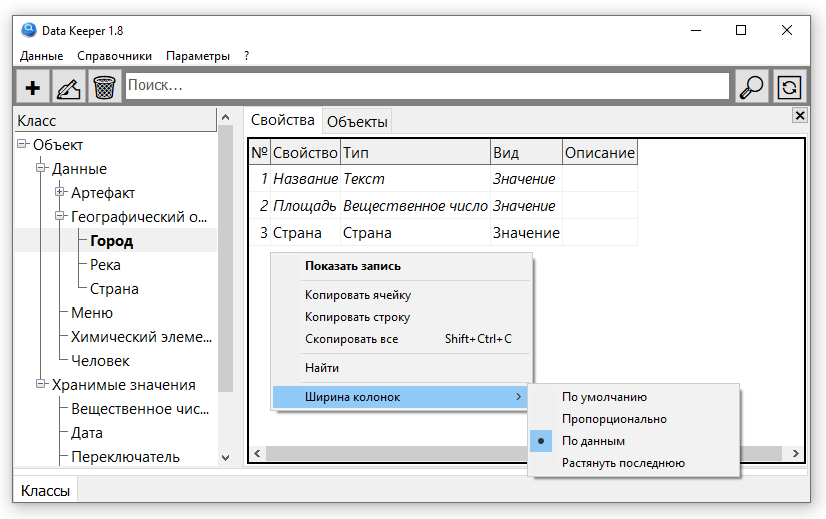
Setting Column Width
Custom control of column width alignment in grid.
https://k245.ru/en/mvdb-en/setting-column-width.html
I see that you are using an outdated sqlite.dll (2014) in your project, you would be better of with a newer version which provides new features!!
Which version do you recommend using?
Автовыравнивание колонок
Пользовательское управление выравниванием ширины колонок в табличном представлении.
Derek, You are absolutely right: this combobox does not have a name. But you can get to it through the form's components[] property
For research, you can use Component Explorer, which is included in the free ClearApp program
There are no exact data. But the feature indicated in the description significantly speeds up debugging applications that have many screen forms.
Читаем
select *
from z
left join x on  x.id = (select max(x2.id) from x as x2 where x2.id_z = z.id )
left join y on  y.id = (select max(y2.id) from y as y2 where y2.id_z = z.id )
и переводим на русский язык:
Выбрать все данные
из таблицы Z,
присоединив к каждой записи данные из таблицы X по правилу: значение Х.ID равно результату выборки подзапроса,
присоединив к каждой записи данные из таблицы Y по правилу: значение Y.ID равно результату выборки подзапроса.
Разбираем подзапрос
select max(x2.id) from x as x2 where x2.id_z = z.idВыбрать максимальное значение из таблицы X, которую мы будем называть X2, при условии, что значение поля id_z равно значению поля id из таблицы Z
X2 - это алиас, чтобы не нарваться на коллизии имен полей, так как подзапрос использует ту же таблицу, что и основной запрос.
Если не хотите выкладывать проект, то найдите на форуме человека, который решит ваш вопрос за деньги или даром, и напишите ему в личку. Разработчик MVDB не занимается разработкой или доработкой проектов, созданных на платформе MVDB.
My Visual Database → Posts by k245
Powered by PunBB, supported by Informer Technologies, Inc.
Theme Hydrogen by Kushi